
How To Fix A Hole In An Air Mattress: A Sleepologist’s Step By Step Guide
You blow up the air mattress, tuck in the guest sheets, and feel like you have it all handled. Then at two in the morning, you or your guest wakes up on the floor with a half-deflated bed and a sore back. It is frustrating, a little embarrassing, and it can turn a visit or camping trip into a long night of clock watching. If you are here, you are probably dealing with that exact scenario or trying to prevent it from happening again.
Air mattresses are meant to be convenient backup beds, but when they leak, they stop doing the one thing you truly need them to do, which is hold air consistently through the night. According to the Sleep Foundation, sleep interruptions and uncomfortable sleep surfaces both reduce deep sleep and REM sleep, which are the stages your brain and body rely on for recovery. That means a simple, slow leak is not just annoying, it can genuinely affect how restored you or your guests feel the next day. Knowing how to repair a leak properly is part comfort, part health, and part hospitality.
Here at Sleepology, we see air mattresses as a useful tool, especially for guests, small spaces, and travel, but not a long term substitute for a supportive mattress. My goal as a sleepologist is to help you make the best of what you have right now, while also knowing when to upgrade to something more durable and supportive. You will learn how to find a tiny, sneaky leak, how to patch different types of air mattress surfaces, what materials are safe to use, and how to test your repair so you do not end up repeating the same process at midnight.
By the end, you will have a reliable process for how to fix a hole in an air mattress, plus some guidance on when repairing is no longer worth it and a better guest bed solution makes more sense. You will also see a few protective products that can help your main mattress or guest setup last longer, so that you can focus on sleep, not on leaks and last minute fixes.
Understanding Why Air Mattresses Leak In The First Place
Before you jump into patching, it helps to understand what causes leaks. That way, you are not just fixing a symptom, you are also reducing the chances of it happening again. Most air mattresses are made from PVC or similar plastics that are strong but not invincible. Over time, folding, unfolding, and rolling the bed can create stress at seams and corners, which is where many slow leaks begin.
Temperature plays a role too. When air cools, it contracts, which lowers internal pressure and can make your mattress feel softer even if it is not actively leaking. This is one reason campers often wake up to a saggy mattress in the early morning hours when outdoor temperatures drop. It is worth knowing the difference between a true puncture and normal overnight pressure changes so that you are not chasing leaks that do not exist.
Usage and storage habits are another big factor. Placing an air mattress directly on rough ground, near pet claws, or on a floor with small debris creates many opportunities for tiny punctures. Storing the mattress when it is still damp from cleaning or outdoor humidity can also weaken the material over time. The Cleveland Clinic has noted that damp environments encourage mold and material breakdown in household items, and air mattresses are no exception.
Finally, manufacturing defects are possible, although less common than daily wear and tear. If a relatively new air mattress repeatedly leaks around a seam, despite careful use, you may be dealing with a weak weld from the factory. In those cases, a patch may buy you some time, but the structure might continue to fail. Knowing this can help you decide how much effort to put into repair versus replacement.
“We had an air bed for our spare room that kept going flat by morning, and I was ready to throw it out. Mia’s advice helped me realize the problem was a tiny seam issue and how we were storing it. A careful patch extended its life for another six months while we saved up for a real guest mattress.” – Karen P., November
Safety And Preparation Before You Patch
Choosing A Safe Workspace And Materials
Repairing an air mattress is not complicated, but it does involve adhesives, cleaners, and sometimes sharp tools. It is wise to set yourself up in a safe, controlled workspace before you start. Choose a flat surface that is clean, dry, and free of anything sharp, like a table or a smooth floor with a blanket or towel underneath. This prevents new punctures while you are working and makes it easier to press a patch firmly into place.
Ventilation matters as well. Many patch kits and glues use solvents that should not be inhaled in a small, closed room for long periods. Work near an open window or in a well ventilated area, especially if you are using strong PVC cement or cleaning fluids. The Mayo Clinic advises limiting exposure to strong chemical fumes whenever possible, particularly if anyone in the household has asthma or chemical sensitivities.
Gathering your materials in advance also keeps the process smooth. At minimum, you will want mild soap and water, a clean cloth or sponge, a permanent marker or piece of painter’s tape, and the patching method you plan to use. If your mattress came with a repair kit, that is a good place to start. If not, you can use a third party vinyl repair kit, specialized inflatable patch, or in some cases strong tape designed for waterproof repairs. The key is to match your patch to the mattress material and surface texture.
Take a moment to look for the manufacturer’s instructions on the mattress itself or on the original packaging. Some brands specify which adhesives are safe for their particular plastic blend. Others warn against using certain solvents on the flocked, fuzzy side. When in doubt, testing cleaners and glues on a small hidden area can keep you from damaging the visible sleep surface.
Understanding Different Mattress Surfaces
Not all air mattresses have the same finish. Some are smooth PVC on both sides, others have a velvety or flocked top surface, and more premium models might have built in toppers or fabric shells. These differences matter for patching, because adhesives do not behave the same way on textured fibers as they do on slick plastic.
Smooth PVC is generally the easiest surface for patching. Most vinyl repair kits are designed for this type of material, and patches can form a tight bond with the right cleaning and pressure. The challenge is often locating the leak, not attaching the patch. Once you know where the issue is, the patching process is usually straightforward.
The flocked or fuzzy side takes a little more patience. Those soft fibers are wonderful for keeping sheets from sliding around, but they also interfere with adhesive contact. In many cases, you will need to carefully remove or flatten some of that fuzz to create a clean, smooth area for your patch to grip. This is where people sometimes reach for strong solvents like acetone, which can work in small, controlled amounts but must be used cautiously to avoid damaging the underlying plastic.
If your air mattress is encased in fabric or has a quilted top layer, you may not be able to patch from the outside at all. In these cases, you might need to unzip or open the fabric cover to access the actual air chamber. Some designs allow this easily, others do not. If the design hides the bladder completely and there is no way to open it without cutting seams, that mattress may be better suited for replacement than complex surgical repairs.
“I was nervous about working on the fuzzy top, because I had read horror stories about people melting their mattress. The step by step preparation tips helped me clean a small patching area without ruining the texture, and the mattress held air for an entire weeklong visit.” – Daniel R., October
How To Find A Leak In An Air Mattress

Step 1: Rule Out Normal Air Loss
Before you assume there is a hole, it is worth ruling out the normal softening that happens from temperature changes and stretching. New air mattresses, in particular, can relax a bit for the first few uses. Inflate your mattress fully, then lie on it for a few minutes to see how much it compresses under your weight. Top it off again and check after several hours at a stable room temperature.
If the mattress feels slightly softer but still supportive after eight hours, you might not have a real leak. On the other hand, if you are waking up with your hips on the floor and the mattress walls sagging inward, that is more likely a puncture or seam issue. The Sleep Foundation points out that consistent spinal support is critical for avoiding back pain, so a bed that leaves you bottoming out is more than just a minor annoyance.
Check the valve as your first potential culprit. Many slow leaks come from a valve that is not quite seated correctly or has dust or debris interfering with the seal. Firmly push or twist the valve closed according to the manufacturer’s design, then listen closely for any hissing. You can gently flex the area around the valve to see if it changes the sound. If tightening the valve solves your problem, you have just fixed the simplest kind of “leak.”
Once you have excluded normal stretching and valve issues, move on to a systematic leak search. Having a clear process here matters, because tiny holes can be incredibly sneaky and easy to miss if you look randomly.
Step 2: Use Sound, Feel, And Sight
Start with a partially inflated mattress. If it is too firm, it will be difficult to press down and sense air movement. Aim for a level where the mattress holds its shape but gives easily under your hands. Place it in a quiet room so you can hear any subtle hissing. Moving slowly around the surface, apply gentle pressure and bring your ear close to the material, especially near seams and the valve.
If hearing is not helping, switch to touch. Wet the back of your hand or your fingertips slightly with water. Then hover them just above the surface as you press on different areas. Escaping air will feel cool and create a noticeable sensation against the damp skin. This method can be surprisingly effective for pinpointing very small leaks.
You can also visually inspect the mattress under good lighting. Look for spots that appear scuffed, scratched, or slightly indented. Punctures sometimes show up as tiny dark dots or irregular shapes, especially along fold lines where the mattress has been creased during storage. Take your time and move in a gridlike pattern so you are not checking the same area repeatedly while accidentally skipping another.
When you think you have found a suspect location, mark it immediately with a permanent marker or small piece of painter’s tape. This prevents you from losing track of the spot while you continue searching. Remember that there can be more than one hole, especially if the mattress met something sharp or was dragged across a rough surface. Keep inspecting until you have systematically covered the entire top, bottom, and sides.
Step 3: The Soapy Water Method
If the leak remains stubbornly hidden, the classic soapy water method is your next step. Mix a small amount of mild dish soap with water in a bowl or spray bottle until you have a slightly foamy solution. Avoid harsh detergents that contain bleach or solvents, since those can degrade PVC materials over time.
Lay the partially inflated mattress on a flat surface and apply the soapy solution to small sections at a time. You can use a sponge, cloth, or spray bottle. Focus on seams, corners, and any areas you suspect based on your earlier inspection. As you press gently on the mattress, watch closely for tiny clusters of bubbles that form and grow. Those bubbles are escaping air marking your leak.
This process can be a bit messy, so have dry towels on hand. Once you locate a bubbling area, wipe it dry, confirm it one more time with a little more solution if needed, then clearly mark the center of the leak. Rinse away excess soap and dry that section thoroughly before you move on to patching. Adhesives do not stick well to damp or soapy surfaces, so this step of rinsing and drying is not optional.
Some people fill bathtubs and submerge sections of the mattress, watching for streams of bubbles. This can work, but it is cumbersome and can introduce a lot of water into seams and valves. For most situations, the targeted soapy water technique on the surface is effective enough and gentler on the mattress.
How To Fix A Hole In An Air Mattress: Step By Step Repair
General Preparation For Any Patch
Once you have identified and marked the leak or leaks, fully deflate the mattress. This is one of the most common mistakes people make, trying to patch while the mattress is inflated or partially inflated. When the material is under tension, patches do not seat properly and can peel or lift once pressure changes. Deflating allows the plastic to lie flat and gives your patch a stable base.
Clean the area around the leak with mild soap and water, even if you used the soapy water method to find it. Wipe away any dirt, body oils, or residue that could interfere with adhesion. Rinse with a clean damp cloth and then dry the area thoroughly. Many vinyl patch kits also recommend lightly scuffing the surface with fine sandpaper to improve the bond, but only do this if the instructions specifically advise it and if your mattress surface is smooth PVC.
Lay the mattress on a hard, flat surface if possible. A smooth floor with a folded towel underneath, or a large board on top of a carpet, helps ensure you can press the patch firmly and evenly. Position the leaking area so you can apply pressure comfortably. Having a heavy book, a flat-bottomed pan, or another rigid weight nearby will help you maintain pressure during the cure time.
At this point, double check your repair kit instructions or adhesive directions. Different products have different cure times and application methods. Some require you to apply glue to both surfaces and wait until it becomes tacky, while others use self adhesive peel and stick patches that do not need extra glue. Being patient with these details makes the difference between a patch that holds and one that fails.
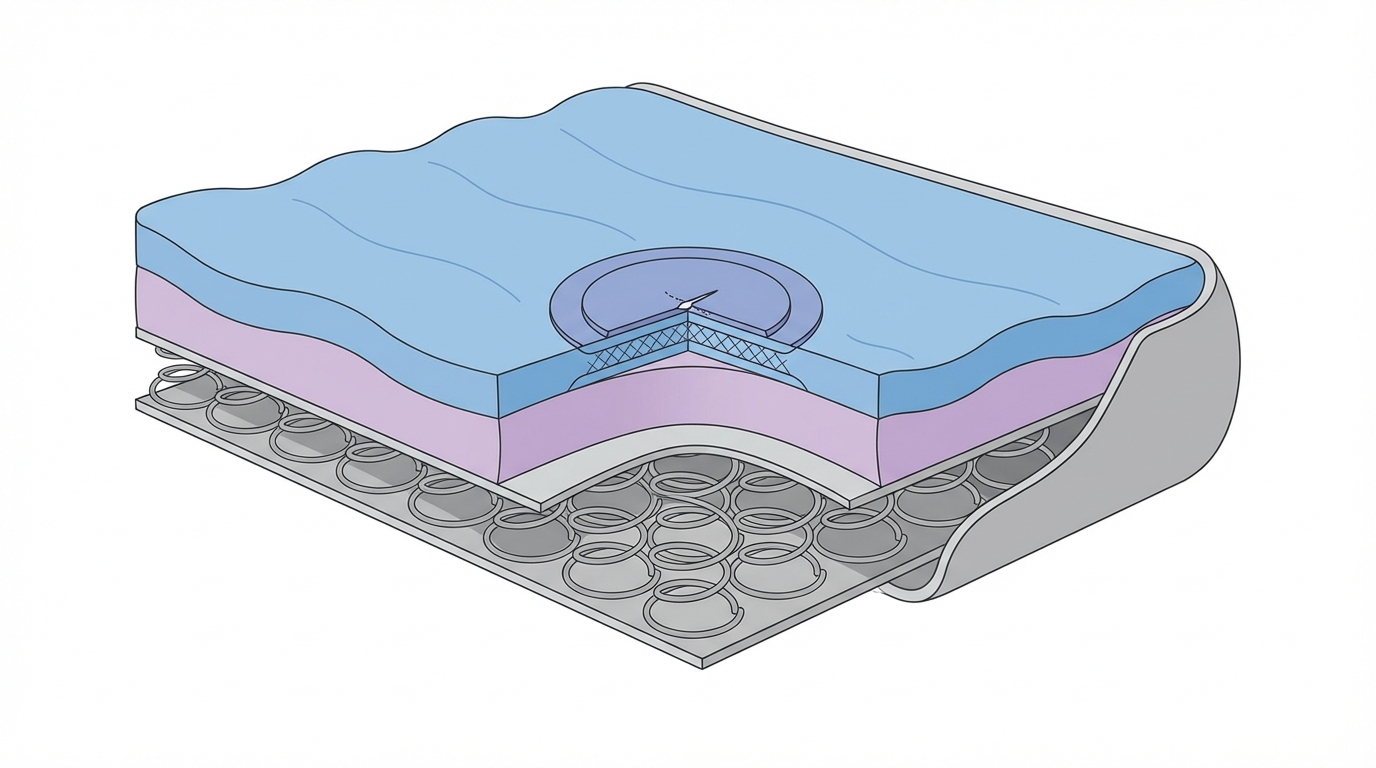
Using A Standard Vinyl Or PVC Repair Kit
If your air mattress is smooth PVC or similar plastic, a standard vinyl repair kit is often the best option. These kits usually include pre cut patches and a tube of adhesive designed for inflatables. Cut a patch that extends at least one to two inches beyond the edges of the hole on all sides. Rounded corners are less likely to peel than sharp ones, so trim the patch corners into a smooth curve.
Apply a thin, even layer of adhesive around the leak on the mattress surface and on the back of the patch, if your kit calls for that. Avoid globbing on too much glue, which can create lumps and compromise the seal. Wait the recommended time until the adhesive becomes tacky instead of wet. Then carefully position the patch over the leak, starting at one edge and smoothing across to the other to push out any trapped air.
Once the patch is in place, press firmly from the center outward with your fingers, a small roller, or the flat side of a spoon. The goal is full contact without bubbles or wrinkles. Place a piece of plastic wrap or wax paper over the patch if you are concerned about sticking, then put a flat, heavy object on top to maintain pressure. Leave it undisturbed for the full cure time mentioned in the kit instructions, which might be anywhere from several hours to a full day.
After curing, remove the weight and inspect the edges of the patch. They should be flat and fully bonded, with no lifting corners. If everything looks secure, partially inflate the mattress and listen for leaks. Then inflate it fully and let it sit for several hours or overnight to confirm the repair before you trust it with a full night’s sleep.
How To Patch The Flocked Or “Fuzzy” Side Of An Air Mattress
Why The Flocked Side Is Tricky
The flocked or velvety side of an air mattress is notoriously difficult to patch, which is why so many people end up asking how to fix a hole in an air mattress specifically on the fuzzy side. The problem is that adhesives are designed to bond with solid surfaces, not loose fibers. If you try to stick a patch directly on top of the untouched flocking, it may adhere at first but often peels away under pressure.
To create a strong fix, you need to carefully remove or compress the fuzzy layer in a small area around the leak, exposing the smoother material underneath without thinning or damaging it. This is a delicate balance. Too little preparation, and your patch will not stick. Too aggressive, and you risk weakening the very surface you are trying to repair. Patience and a light hand are your allies here.
Many DIY forums suggest using acetone-based nail polish remover to dissolve the flocking. It can work, but acetone is a strong solvent that can soften PVC if used too heavily or over a large area. If you choose this method, do so in a well ventilated space and with a cotton swab or small cloth, focusing on the fibers rather than soaking the plastic. Always test on a hidden section first to see how your specific mattress material reacts.
An alternative approach is gentle mechanical removal using fine sandpaper or a sharp razor held almost flat to the surface, shaving the fibers rather than scraping the plastic. This can take a bit longer, but it gives you more control. Whichever method you choose, your goal is a small circle or oval of mostly smooth material around the leak, large enough to fit your patch with at least one inch of overlap in all directions.
Step By Step Patching On The Fuzzy Side
Start by fully deflating the mattress and marking the center of the leak clearly. Clean the area with a little mild soap and water, then dry it completely. If you are using acetone-based nail polish remover, apply a small amount to a cotton ball or cotton swab rather than directly to the mattress. Gently rub the flocked surface around the leak in small circles, watching as the fibers dissolve or lift away. Keep your motion light and move slowly. Stop frequently to check whether the underlying plastic is becoming tacky or discolored.
If you notice any softening or distortion of the plastic, pause and allow it to dry, then switch to a more mechanical approach like light sanding. With fine sandpaper, use short, gentle strokes or circles to abrade the fibers without removing too much material. You do not need a perfect glossy surface, you simply need to expose a reasonably smooth, non fuzzy layer for the adhesive to grip.
Once the fuzzy layer is reduced in your target zone, wipe away any loose residue with a clean, slightly damp cloth and then dry again thoroughly. You should see a halo of clearer, smoother material around your leak. Cut your patch to size, again giving at least an inch of overlap beyond the prepared area on all sides. Rounded corners are important for resisting peeling.
Apply your chosen adhesive according to its directions, both on the prepared mattress area and on the back of the patch if required. Wait until the glue is tacky, then carefully position the patch over the leak. Because you have altered the surface, be especially deliberate as you press and smooth the patch into place. Using a roller or the rounded back of a spoon can help you ensure full contact.
Place a protective layer such as plastic wrap over the patch, then add a flat, heavy object to maintain steady pressure while the adhesive cures. Follow the maximum recommended cure time to give the bond every chance to set completely. When you test the repair, start with partial inflation and listen carefully, then do a full inflation and let it sit for at least several hours.
“I always thought a leak on the fuzzy side meant game over. After carefully clearing a small patch area and using a proper vinyl kit, our mattress survived a full weekend of kids using it as a trampoline. That repair probably saved us 80 dollars right there.” – Miguel S., December
Quick Fixes You Can Use In A Pinch
Temporary Patching Options
Sometimes you discover a leak right before guests arrive or after you have already set up camp, and you simply do not have time for a full cure process or do not have a dedicated patch kit. In those situations, temporary fixes can help you get through a night or two, as long as you understand their limits. These solutions are not meant to replace a proper patch, but they can be surprisingly effective for small punctures.
Heavy duty waterproof tape specifically marketed for emergency repairs on inflatables, tarps, or boats can often hold up under low to moderate pressure, especially on smooth PVC. Clean and dry the area thoroughly, then cut a piece of tape large enough to extend well beyond the hole. Apply it slowly from one side to the other, pressing firmly to avoid bubbles. If the leak is on a seam, use extra care to press the tape into the seam groove, and consider adding a second layer shifted slightly so the seams of the tape do not align.
In a true emergency, people sometimes reach for standard duct tape. It is not ideal for long term repairs and may not bond well to flocked surfaces, but on a clean smooth area it can help slow the leak enough to keep the mattress comfortably inflated for a few hours. You will likely need to reinflate once or twice during the night. Once you are back home or have better supplies, peel off the duct tape carefully, clean away any residue, and apply a proper patch.
Self adhesive vinyl strips or bicycle tire patches are another option. While they are not designed specifically for air mattresses, many are compatible with similar materials. Check the packaging for compatibility with PVC or vinyl. Apply them using the same careful cleaning and smoothing steps you would use with a dedicated patch. Again, think of these as bridge solutions that tide you over until you can do a more permanent fix.
When Temporary Fixes Are Enough
There are situations where a temporary repair might actually be all you need. If your air mattress is an older, lower cost model that you only plan to use once or twice more, putting a lot of time and money into it may not make sense. A well applied tape fix could give you the remaining life you need from that product, while you direct your budget toward a more durable guest bed option.
For camping or travel, where conditions are rougher and mattress lifespans are often shorter, having a compact emergency kit with strong repair tape and a small amount of adhesive may be more practical than carrying full patch kits for every possible material. According to several consumer surveys on camping gear, people tend to replace entry level air mattresses every few seasons due to leaks and wear, so balancing your effort with the realistic lifespan of the product is reasonable.
That said, remember that an air mattress, especially a partially deflated one, does not offer the same long term spinal support as a quality sleep surface. If you find yourself repeatedly sleeping on a leaking air bed or waking with new back or hip pain, it may be time to consider a more supportive guest setup instead of relying on repeated temporary fixes.
If you are hosting guests frequently, upgrading to a real mattress can be both kinder to your visitors and more cost effective over time. A supportive yet budget friendly option like the Sealy Posturepedic Pro Soft Dupont II Euro Pillow Top can serve as a dedicated guest bed that feels closer to a primary bedroom experience, without the chronic worries about leaks.
Comparing Repair Methods: What Works Best And When
A lot of the confusion around how to fix a hole in an air mattress comes from conflicting advice online about which repair method is “best.” The truth is that the best method depends on your mattress material, the location and size of the hole, and how long you need the fix to last. To make this clearer, here is a side by side comparison of some common options.
| Repair Method | Best For | Pros | Cons |
|---|---|---|---|
| Dedicated vinyl/PVC repair kit | Smooth PVC surfaces, small to medium holes | Strong, long lasting bond when done properly | Requires cure time and careful prep |
| Inflatable specific patch & repair kits | Camp and travel mattresses, quick reliable fixes | Designed for inflatables, often clear and flexible | May cost more than basic kits |
| Heavy duty waterproof repair tape | Emergency fixes on smooth areas | Fast, no drying time, easy to carry | Less durable, can peel under high pressure |
| Duct tape or generic household tape | One night emergencies only | Widely available, very quick | Poor long term adhesion, messy residue |
| Professional repair or replacement | Large tears, failed seams, older mattresses | Reliable outcome, no DIY stress | Cost may approach or exceed replacement price |
A dedicated vinyl or PVC kit is usually your strongest choice for a smooth sided home air mattress that you want to keep using regularly. These kits have adhesives formulated for the exact material and stress profile of inflatables. Inflatable specific patch kits fall into a similar category, with the convenience of clear patches that are less noticeable and often rated for outdoor exposure.
Repair tapes shine in situations where you need to act fast and do not have the time or ability to let adhesives cure. They are also handy backups when you are traveling. Duct tape and general household tapes are at the very bottom of the list, suitable only when nothing else is available.
Professional repair is uncommon for typical home air mattresses, but for high end air beds or specialized inflatable systems, manufacturers may offer repair or replacement programs. It is worth checking your warranty before doing extensive DIY work, since some modifications can void coverage. Consumer Reports has long noted that understanding your warranty and product lifespan expectations helps you make smarter replacement decisions, and that applies here as well.
When To Stop Repairing And Consider A Better Sleep Solution
Signs Your Air Mattress Is Past Its Prime
Just because you can patch an air mattress does not always mean you should, at least not indefinitely. Repeated leaks, especially in different areas, suggest that the material as a whole is wearing out. If you find yourself patching one hole, only to have another seam split a few weeks later, the plastic may have reached the end of its effective life.
Seam failures are another red flag. While tiny pinholes in the middle of a panel are relatively easy to handle, long splits along seams or corners are structurally more serious. Even if you manage to seal the immediate gap, the surrounding area has already been stressed and is likely to fail again. When more than one seam has needed repair, relying on that mattress for overnight guests is risky.
Pay attention to comfort as well as leaks. If your air mattress has deep permanent sagging areas, uneven height, or bulging sides when inflated, it is not providing consistent support even if it technically holds air. The Sleep Foundation emphasizes that mattress support and pressure relief are key contributors to sleep quality. A bed that leaves your guests’ hips sinking and shoulders unsupported can contribute to aches and poor rest, which defeats the purpose of offering a “spare bed” at all.
Finally, consider hygiene. Older air mattresses that have been stored in damp basements, used outdoors frequently, or have visible staining or odor may not be worth salvaging, even if you can repair leaks. Moisture and time can allow mold or bacteria to grow in seams and inside the mattress, which is not something you want to share with guests or use yourself.
Upgrading Your Guest Setup For Better Sleep
If your air mattress is nearing the end of its life, this can be a good moment to rethink your guest or backup sleep strategy altogether. For families who frequently host parents, adult children, or friends, a real mattress on a simple platform or adjustable base is often a far more comfortable and reliable solution. It also doubles as an everyday reading or napping space for you between visits.
For example, pairing a supportive medium feel model like the Sealy Posturepedic Medium Medina II Euro Pillow Top with a basic foundation creates a guest bed that feels closer to a main bedroom than a temporary fix. If you have guests who prefer a firmer feel, the Sealy Posturepedic Plus Firm Paterson II Euro Pillow Top offers extra lumbar support that can be kinder to sore backs than any inflatable.
For smaller spaces or multi use rooms, an adjustable base can be a smart upgrade. A compact adjustable bed frame under a comfortable mattress lets the space function as a lounge or media room when you do not have guests, then transforms into a fully supportive sleep surface when you do. Compared to inflating and deflating an air bed, simply raising or lowering the head of an adjustable base tends to be a far less stressful ritual.
If you still want the flexibility of an air mattress for camping or occasional overflow, but want a nicer experience for everyday guests, consider keeping a high quality topper and pillow bundle on hand. A set like the Tempur-Pedic Mattress Topper Travel and Guest Bundle can add comfort and familiar support whether it sits on top of a new air mattress or a sofa bed, and it packs away neatly between uses.
Protecting Your Mattress Investment Going Forward

Prevention Tips For Air Mattresses
Once you have patched a leak or invested in a better mattress, a few simple habits can dramatically reduce future issues. Always use some kind of barrier between the mattress and the floor. This can be as simple as a thick blanket, foam tiles, or a dedicated mattress pad. The barrier shields the vinyl from tiny debris, splinters, or rough concrete that create pinholes and abrasions.
Keep pets’ claws and sharp objects away from the mattress. That might mean giving your dog a separate bed nearby or placing a folded blanket on top of the air mattress for extra protection. Have guests avoid sitting on the very edges of the mattress with concentrated weight, which can stress seams. Teaching kids not to jump on an air bed can be a challenge, but it is one of the biggest ways to extend its life.
When storing the mattress, make sure it is completely dry and clean. Wipe off any condensation or spills and let it air dry before deflating. Fold loosely instead of making extremely tight rolls that strain seams, and avoid stacking heavy objects on top of the stored mattress. Ideally, keep it in a temperature controlled space rather than a humid garage or attic.
Using a dedicated mattress protector on your main mattress or a high quality guest bed is just as important. Waterproof, breathable protectors like the TEMPUR Adapt Waterproof Hypoallergenic Mattress Protector shield against spills, sweat, and dust mites without adding noticeable heat. This helps your mattress stay supportive and hygienic for many more years, so you are not relying on an air bed as a backup when a main mattress wears out prematurely.
Everyday Care For Long Term Comfort
Good sleep surfaces are part of an overall sleep healthy environment, and maintenance is a piece of that puzzle. According to organizations like the Mayo Clinic, reducing allergens and maintaining a clean, comfortable sleep space can improve sleep continuity and daytime alertness. For mattresses, that means regular vacuuming of surfaces, occasional rotation if the model allows it, and attention to moisture control.
For air mattresses that you still use, check them briefly before and after each use. A quick inspection for visible wear, combined with careful storage, makes future repairs easier and less frequent. For your permanent mattresses, pairing a protector with quality bedding from a collection like pillows, sheets, toppers, and protectors helps keep the sleep surface fresh and supportive.
If you or your guests consistently wake up with pain, numbness, or excessive stiffness, it may be worth talking with a healthcare provider as well as a sleep specialist. While an air mattress leak is easy to fix, chronic discomfort may be a sign that you need a deeper evaluation of both your sleep surface and your sleep health overall.
Conclusion: From Nighttime Leak Panic To Confident Repairs
Learning how to fix a hole in an air mattress transforms a stressful midnight problem into a manageable household task. Once you know how to locate a leak, prepare the surface, and choose the right patching method for either smooth or flocked material, you can approach repairs calmly and systematically. Instead of guessing or layering random tape, you are giving the mattress its best chance to hold air reliably again.
Just as important, you now have a clearer sense of when patching is worth your time and when a mattress has simply aged out. When leaks keep appearing or seams start failing, it is often kinder to your guests, and your own back, to invest in a sturdier sleep solution. A well chosen guest mattress, paired with a quality protector, can turn a spare room from an improvisation into a place you would be happy to sleep in yourself.
Whether you stick with a patched up air bed for occasional camping, or upgrade to a supportive model from Sleepology’s curated collection, you do not have to accept waking up on the floor as part of the deal. If you are unsure which direction to go next, or want help matching a real mattress to the way you and your guests actually sleep, you are always welcome to reach out for personalized guidance. Better sleep begins with feeling supported, both by your bed and by the experts helping you choose it.
Frequently Asked Questions
How do I fix a small pinhole in an air mattress without a repair kit?
For a small pinhole, clean and dry the area thoroughly and then use a strong, waterproof repair tape designed for vinyl or inflatables as a temporary fix. Cut a piece that overlaps the hole by at least an inch in all directions and press it down firmly, smoothing from the center outward to remove bubbles. This can hold for a night or two, especially on smooth PVC. For a longer lasting repair, follow up later with a dedicated vinyl patch kit using the same cleaned area.
Can I use super glue or hot glue to fix a leak in an air mattress?
Super glue and hot glue are not recommended for air mattress repair. Super glue dries brittle and can crack when the mattress flexes, which often recreates the leak or damages the material further. Hot glue does not bond reliably to PVC and can even soften or warp thin plastics. A purpose made vinyl adhesive or inflatable repair kit is formulated to remain flexible and compatible with the mattress material, which is what you need for a durable seal.
How can I tell if my air mattress leak is from the valve or the fabric?
To check the valve, inflate the mattress and apply light soapy water directly around and on the valve components while gently pressing on the mattress. If you see a steady stream of bubbles or hear hissing right at the valve, the leak is likely there. Sometimes reseating or tightening the valve solves the problem. If the valve area is quiet and dry but the mattress still loses air, move systematically across the fabric panels and seams with the same soapy water method to look for bubbles elsewhere.
Is it safe to use nail polish remover on the fuzzy side of an air mattress?
Acetone based nail polish remover can be used very sparingly and cautiously to remove flocking around a leak, but it must be handled with care. Apply a small amount to a cotton ball and gently work on the fibers, avoiding soaking the plastic beneath. Always test in a hidden area first, work in a well ventilated space, and stop immediately if you see the material softening or distorting. If you are uncomfortable using solvents, gentle sanding or shaving of the fibers is a slower but safer alternative.
How long should I wait after patching an air mattress before I sleep on it?
The wait time depends on the adhesive or patch kit you use, but a good rule of thumb is to follow the maximum cure time listed in the instructions, often between 12 and 24 hours. While some products advertise quicker bonding, giving the patch more time to set under steady pressure usually results in a stronger, longer lasting repair. After curing, inflate the mattress fully and let it sit for several hours before putting full body weight on it overnight.
When is it better to replace an air mattress instead of fixing it?
Replacement is usually the better choice when your mattress has multiple leaks in different areas, repeated seam failures, or visible wear and sagging that affect comfort. If you have patched it more than twice and new problems keep appearing, the material may have aged to the point where it can no longer handle regular use. It also makes sense to replace if the mattress has hygiene issues, such as moldy odors or significant staining, or if your guests consistently wake up sore even when it holds air.
Will using a mattress topper or protector help my air mattress last longer?
A mattress protector or topper can help by reducing direct friction, shielding the surface from spills, and making the bed more comfortable, but it will not prevent all types of punctures. A thin waterproof protector or a soft topper like a memory foam pad distributes weight more evenly and reduces wear in specific spots, which can be helpful. For a permanent mattress, protectors such as the TEMPUR Breeze Cooling Waterproof Mattress Protector also defend against moisture and allergens, extending the life and cleanliness of the mattress underneath.